
iPadOS Navigation
Yesterday we covered the basics of iOS navigation with the new APIs in iOS 16, but we forgot the iPhones bigger counterpart - the iPad. There's been some subtle changes to that too, with more explicit splits that make navgiation a little cleaner.
The basics
Lets take our existing code, and see how it works on iPad.
struct DeeplinkView: View {
    @State var path = NavigationPath()
    @State private var coffees = [ Coffee(name: "Flat White"), Coffee(name: "Cortado"), Coffee(name: "Mocha") ]

    var body: some View {
        NavigationStack(path: $path) {
            List {
                Text("What would you like to drink?")

                Section(header: Text("Coffee"))  {
                    ForEach(coffees, id: \.name) { coffee in
                        NavigationLink(value: coffee, label: {
                            Text(coffee.name)
                        })
                    }
                }
            }
            .navigationDestination(for: Emoji.self) { moji in
                EmojiView(moji: moji)
                    .navigationTitle("Your Moji")
            }
            .navigationDestination(for: Coffee.self, destination: { coffee in
                CoffeeView(onSelectReset: { popToRoot() }, coffee: coffee, otherCoffees: coffees)
            })
            .navigationTitle(Text("Café Logan"))
        }
        .onOpenURL { url in
            let components = URLComponents(url: url, resolvingAgainstBaseURL: false)
            let queryItem = components?.queryItems?.first(where: { $0.name == "moji" })
            guard let emoji = queryItem?.value else { return }
            popToRoot()
            path.append(Emoji(moji: emoji))
        }
    }

    func popToRoot() {
        path.removeLast(path.count)
    }
}
struct DeeplinkView: View {
@State var path = NavigationPath()
@State private var coffees = [ Coffee(name: "Flat White"), Coffee(name: "Cortado"), Coffee(name: "Mocha") ]
var body: some View {
NavigationStack(path: $path) {
List {
Text("What would you like to drink?")
Section(header: Text("Coffee")) {
ForEach(coffees, id: \.name) { coffee in
NavigationLink(value: coffee, label: {
Text(coffee.name)
})
}
}
}
.navigationDestination(for: Emoji.self) { moji in
EmojiView(moji: moji)
.navigationTitle("Your Moji")
}
.navigationDestination(for: Coffee.self, destination: { coffee in
CoffeeView(onSelectReset: { popToRoot() }, coffee: coffee, otherCoffees: coffees)
})
.navigationTitle(Text("Café Logan"))
}
.onOpenURL { url in
let components = URLComponents(url: url, resolvingAgainstBaseURL: false)
let queryItem = components?.queryItems?.first(where: { $0.name == "moji" })
guard let emoji = queryItem?.value else { return }
popToRoot()
path.append(Emoji(moji: emoji))
}
}
func popToRoot() {
path.removeLast(path.count)
}
}That gives us a simple navigation stack, with no implicit split view to take advantage of that bigger screen.
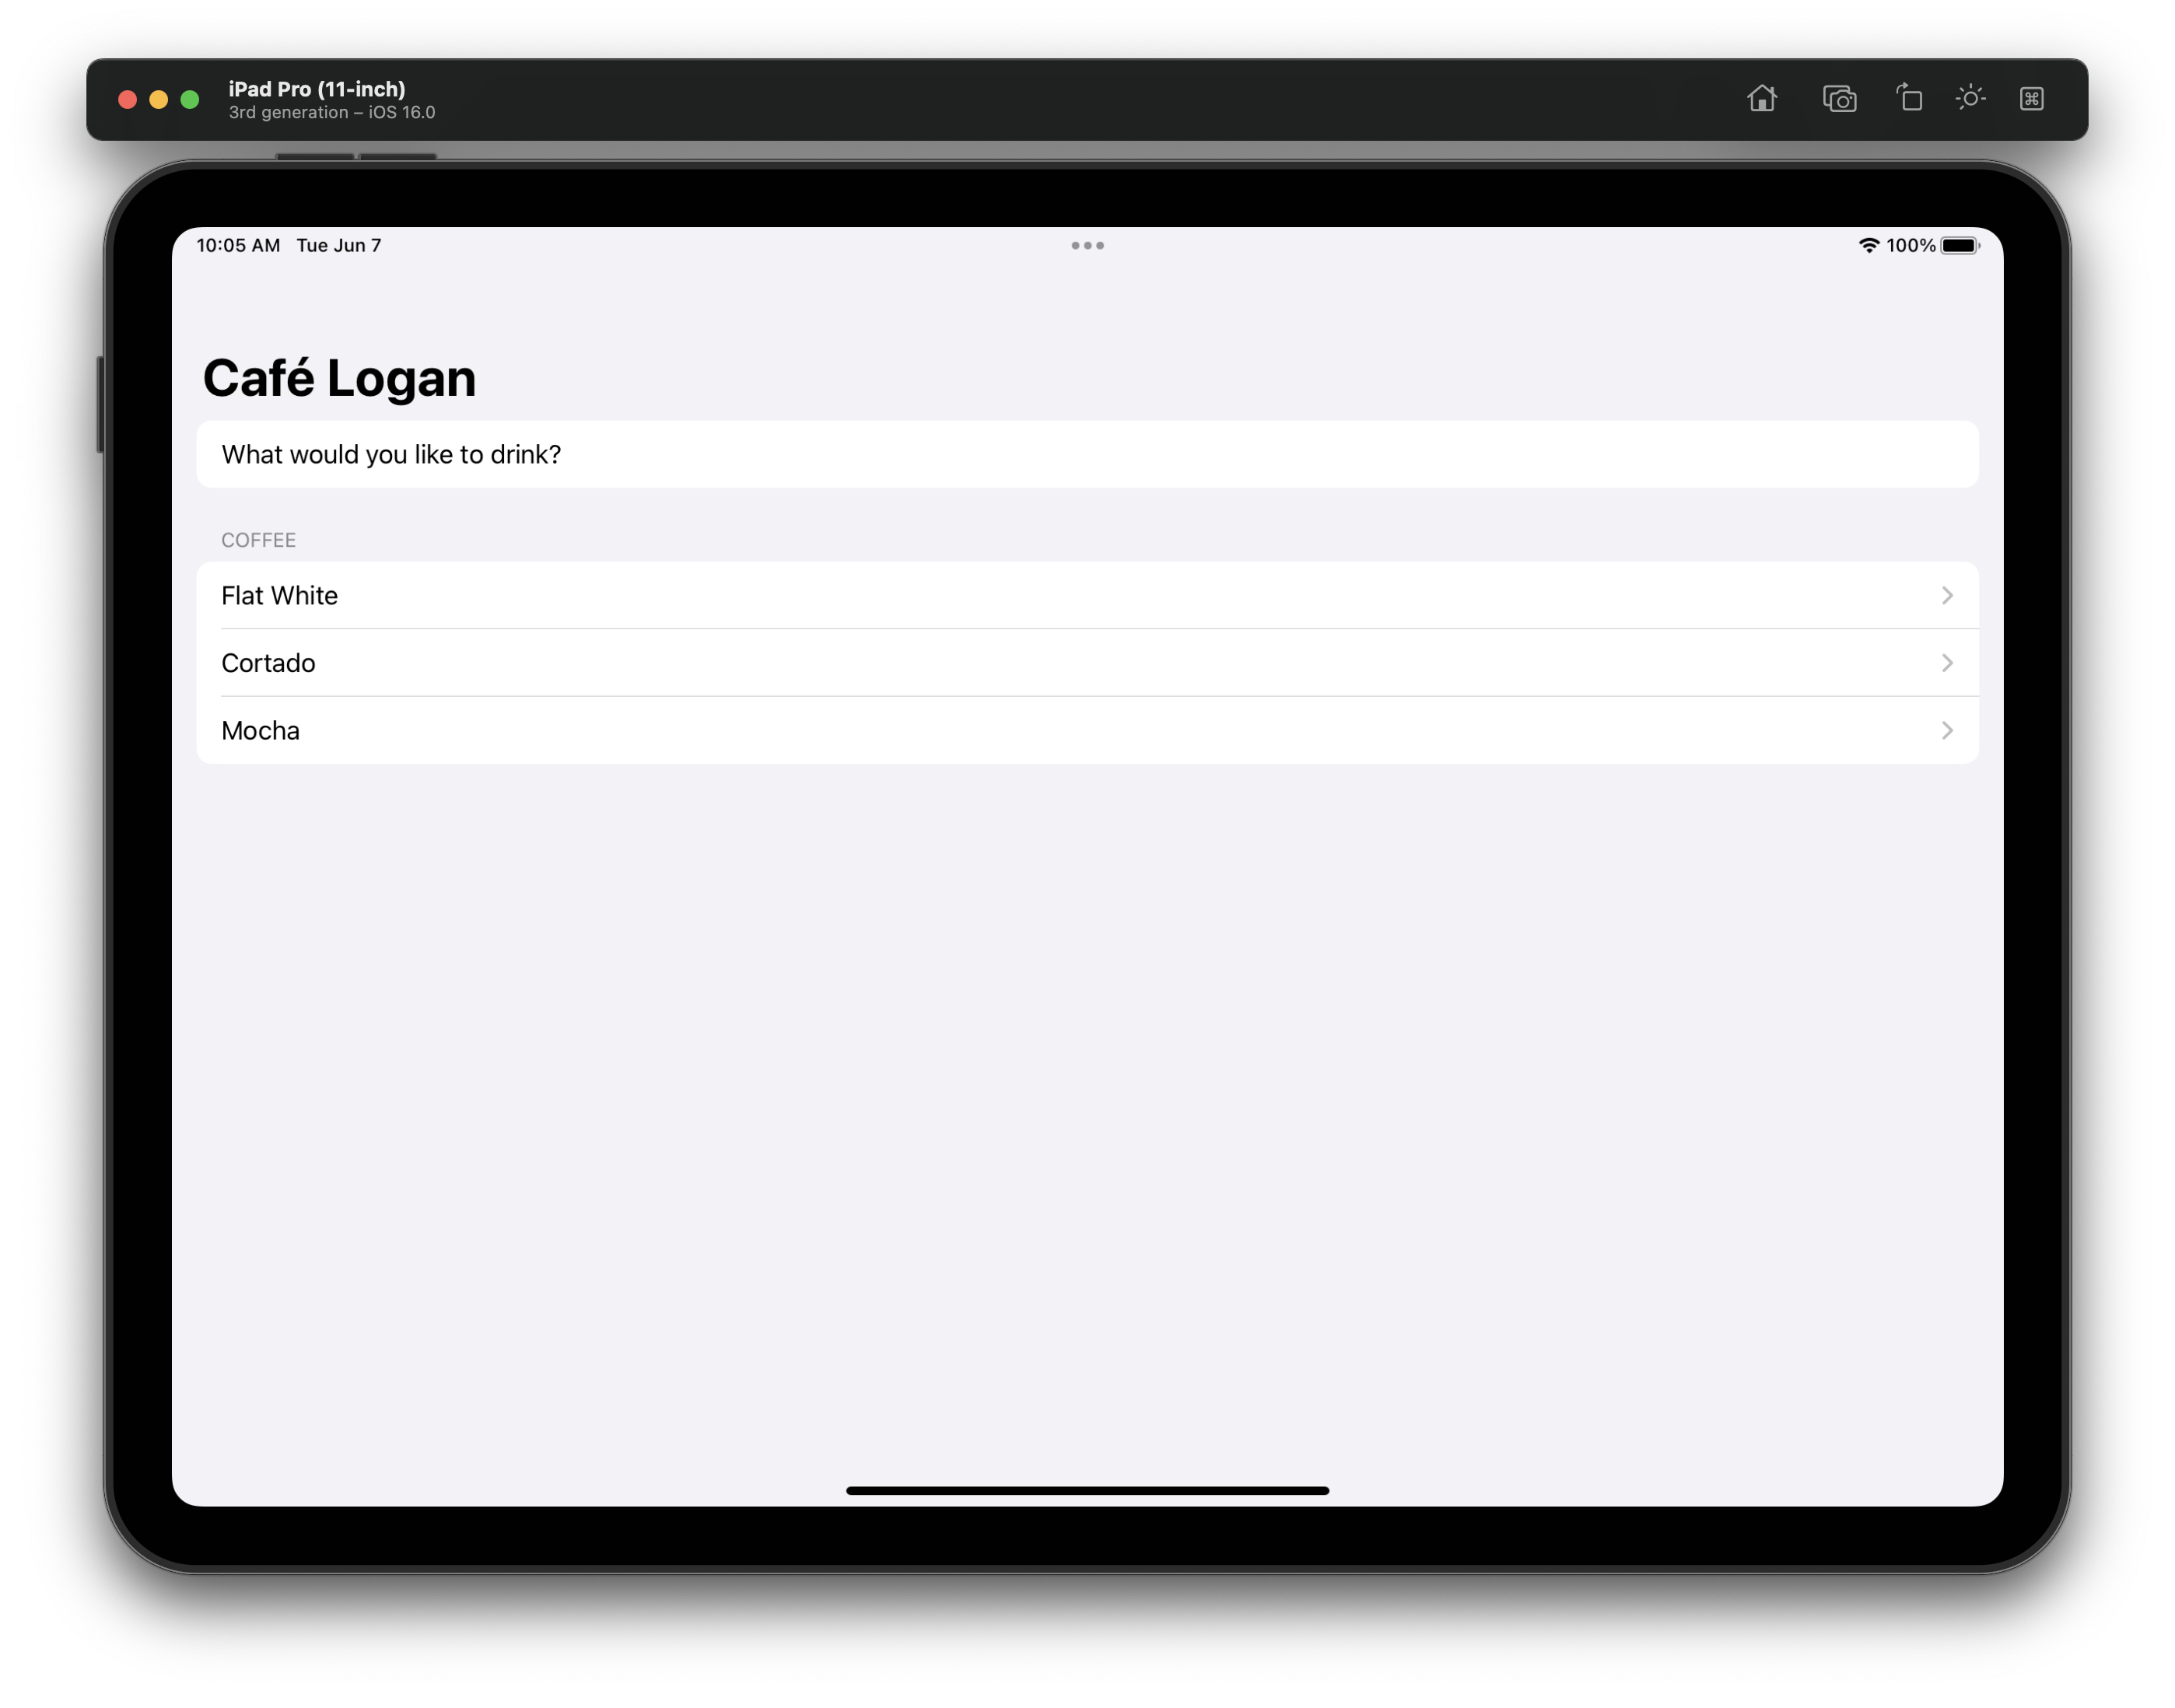
Whilst its great that it just works, we should probably optimise for iPad.
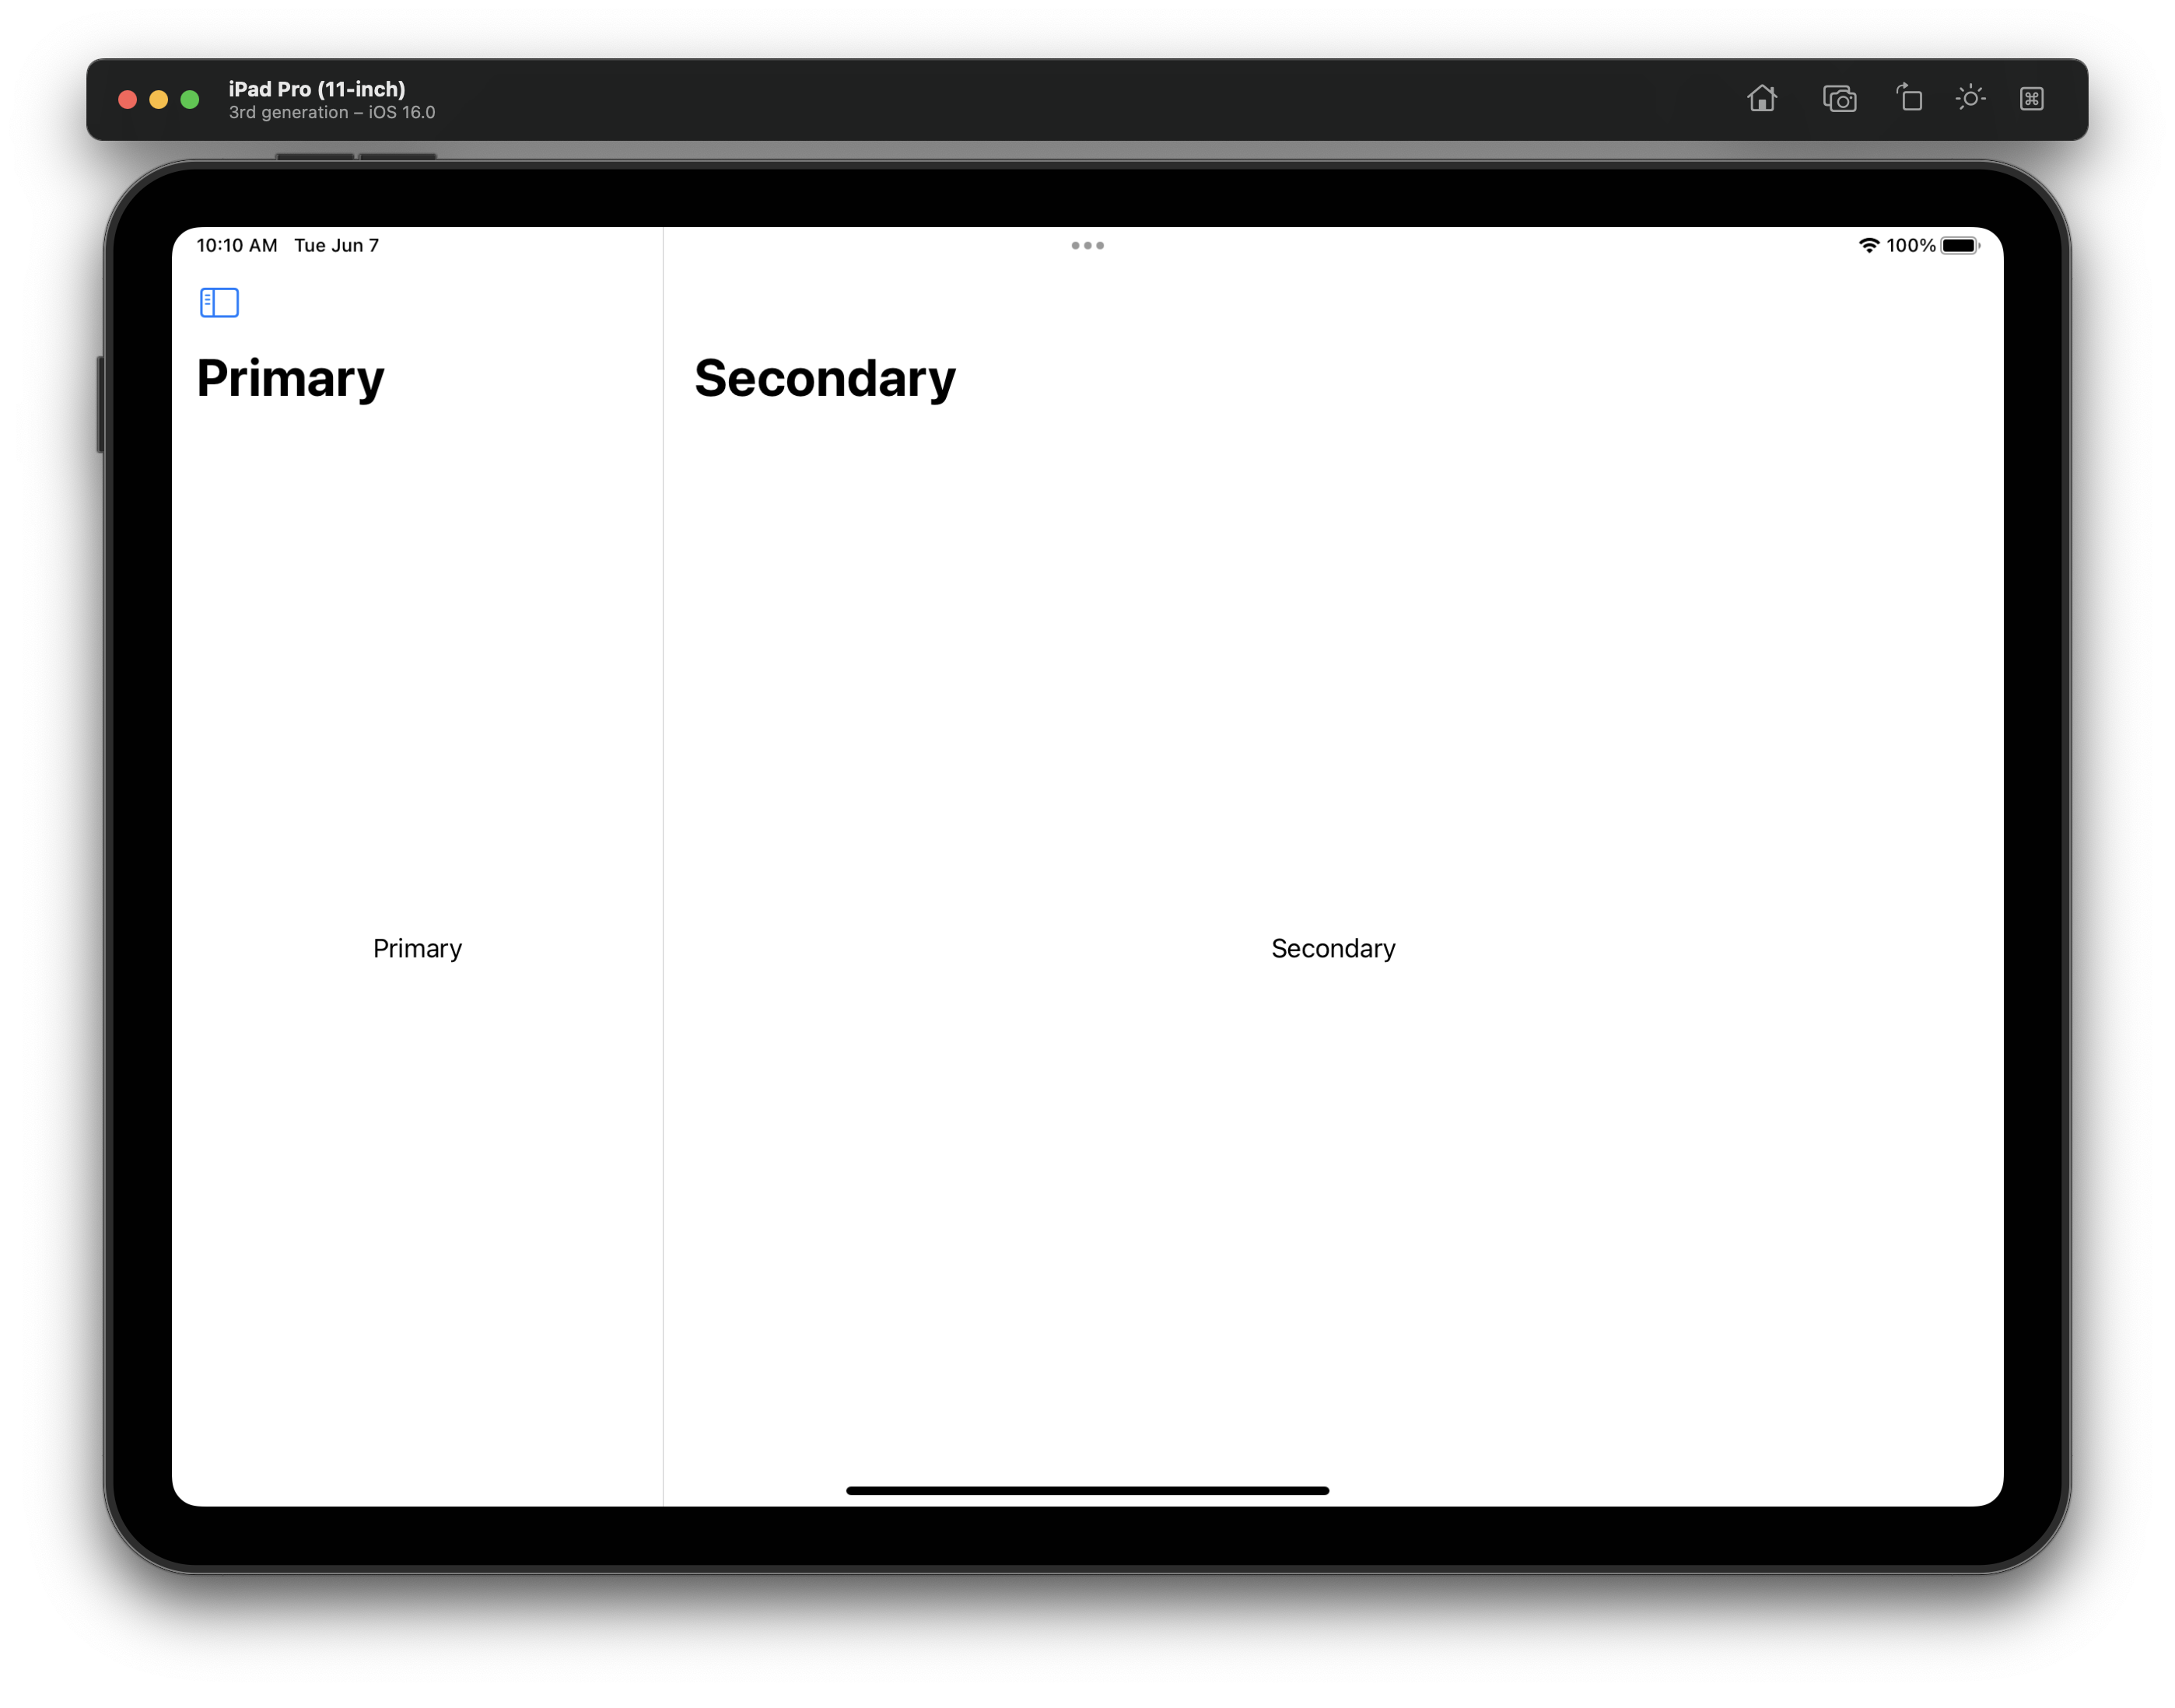
Enter NavigationSplitView. This simple view allows us to specify a primary and secondary column, and manage the state of both of them ourselves.
struct SplitExampleView: View {
    @State var path = NavigationPath()

    var body: some View {
        NavigationSplitView(sidebar: {
            Text("Primary")
                .navigationTitle(Text("Primary"))
        }, detail: {
            NavigationStack(path: $path, root: {
                Text("Secondary")
                    .navigationTitle(Text("Secondary"))
            })
        })
    }
}
struct SplitExampleView: View {
@State var path = NavigationPath()
var body: some View {
NavigationSplitView(sidebar: {
Text("Primary")
.navigationTitle(Text("Primary"))
}, detail: {
NavigationStack(path: $path, root: {
Text("Secondary")
.navigationTitle(Text("Secondary"))
})
})
}
}We now get that familiar iPad style layout with a collapsible sidebar, and secondary content. I've added a NavigationStack in the second view so we can push the content we need later.
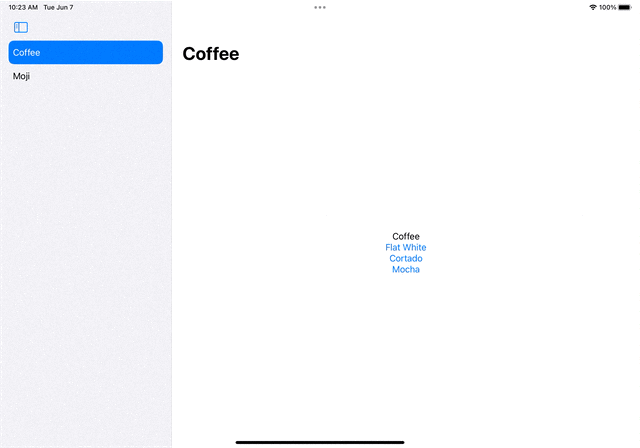
Next, lets add a sidebar to get the classic iPad look. This is exactly how you've done it in the past, simply a list with the sidebar style set on it.
We'll store the selection too.
@State private var selectedItem: SplitItem = .coffee

var body: some View {
    NavigationSplitView(sidebar: {
        sidebar
    }, detail: {
        NavigationStack(path: $path, root: {
            Text("Secondary")
                .navigationTitle(Text("Secondary"))
        })
    })
}

enum SplitItem: String, CaseIterable {
    case coffee = "Coffee", emoji = "Moji"
}

var sidebar: some View {
    List(SplitItem.allCases, id: \.self, selection: $selectedItem) { item in
        Button(item.rawValue, action: { selectedItem = item })
            .tag(item)
    }
    .listStyle(.sidebar)
}
@State private var selectedItem: SplitItem = .coffee
var body: some View {
NavigationSplitView(sidebar: {
sidebar
}, detail: {
NavigationStack(path: $path, root: {
Text("Secondary")
.navigationTitle(Text("Secondary"))
})
})
}
enum SplitItem: String, CaseIterable {
case coffee = "Coffee", emoji = "Moji"
}
var sidebar: some View {
List(SplitItem.allCases, id: \.self, selection: $selectedItem) { item in
Button(item.rawValue, action: { selectedItem = item })
.tag(item)
}
.listStyle(.sidebar)
}Next, lets actually swap out our content based on the sidebar. Inside NavigationStack we can simply switch out the root item as we please, so we'll do that on change of the selected item.
var body: some View {
    NavigationSplitView(sidebar: {
        sidebar
    }, detail: {
        NavigationStack(path: $path, root: {
            Group {
                switch selectedItem {
                case .coffee:
                    coffeeView
                case .emoji:
                    emojiView
                }
            }
            .navigationDestination(for: Coffee.self) { coffee in
                CoffeeView(onSelectReset: { }, coffee: coffee, otherCoffees: coffees)
            }
            .navigationDestination(for: Emoji.self) { emoji in
                EmojiView(moji: emoji)
            }
        })
    })
}

var coffeeView: some View {
    Section(header: Text("Coffee"))  {
        ForEach(coffees, id: \.name) { coffee in
            NavigationLink(value: coffee, label: {
                Text(coffee.name)
            })
        }
    }
    .navigationTitle(Text("Coffee"))
}

var emojiView: some View {
    Section(header: Text("Best emoji"))  {
        ForEach(mojis, id: \.moji) { moji in
            NavigationLink(value: moji, label: {
                Text(moji.moji)
            })
        }
    }
    .navigationTitle(Text("Emoji"))
}
var body: some View {
NavigationSplitView(sidebar: {
sidebar
}, detail: {
NavigationStack(path: $path, root: {
Group {
switch selectedItem {
case .coffee:
coffeeView
case .emoji:
emojiView
}
}
.navigationDestination(for: Coffee.self) { coffee in
CoffeeView(onSelectReset: { }, coffee: coffee, otherCoffees: coffees)
}
.navigationDestination(for: Emoji.self) { emoji in
EmojiView(moji: emoji)
}
})
})
}
var coffeeView: some View {
Section(header: Text("Coffee")) {
ForEach(coffees, id: \.name) { coffee in
NavigationLink(value: coffee, label: {
Text(coffee.name)
})
}
}
.navigationTitle(Text("Coffee"))
}
var emojiView: some View {
Section(header: Text("Best emoji")) {
ForEach(mojis, id: \.moji) { moji in
NavigationLink(value: moji, label: {
Text(moji.moji)
})
}
}
.navigationTitle(Text("Emoji"))
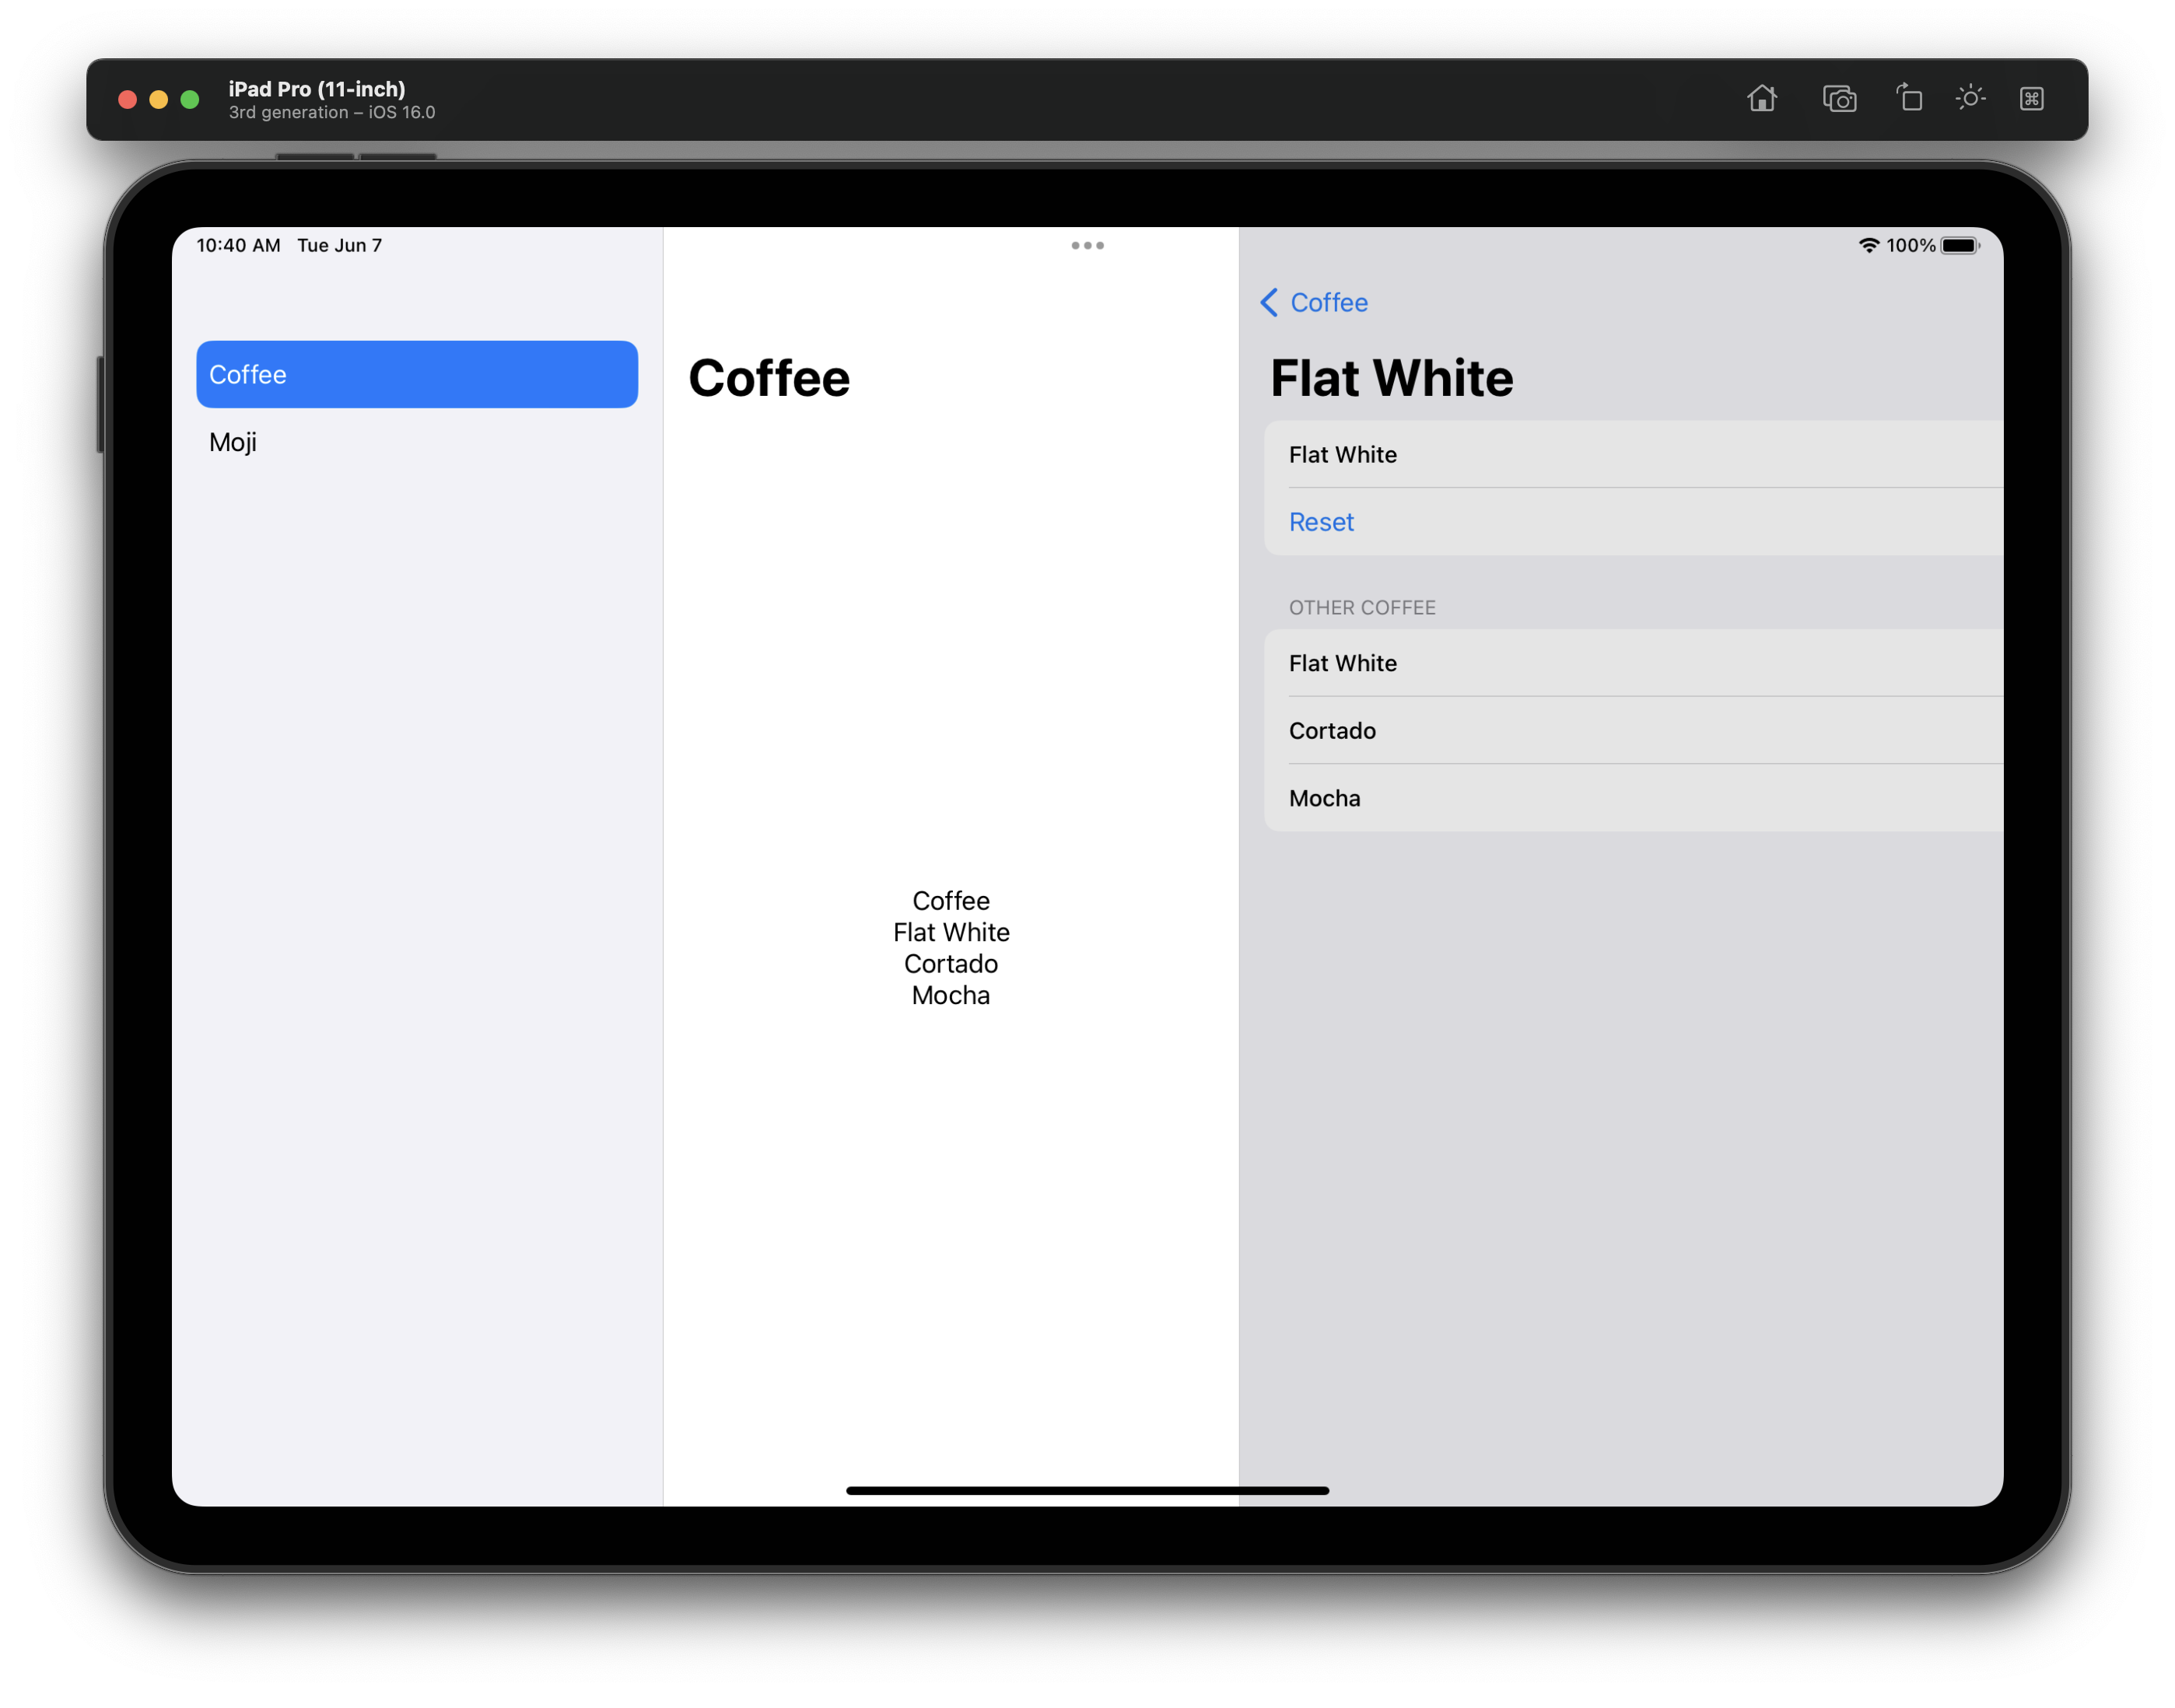
}When we run this, we get a great feeling experience on iPad, with clear selection states and an experience that takes up a lot of the room we have to play with.
One issue you'll notice is that if you switch out the root, the navigation stack doesn't reset on its own. There's a simple trick we can use for this.
.onChange(of: selectedItem) { _ in
    path.removeLast(path.count)
}.onChange(of: selectedItem) { _ in
path.removeLast(path.count)
}Applying this to our body will mean any change of the sidebar selection will entirely reset our navigation stack with a nice animation.

Pushing a little further
NavigationSplitView has a few more tricks we're yet to look at, so lets dive into them.
First, you can control the visibilty of the sidebar columns by providing columnVisibility. This lets you show and hide with your own control, so you might for example want to hide the sidebar if they play a video.
The options for visibility are detailOnly, doubleColumn and all.
struct FancySplitExampleView: View {
...
@State var splitVisibility: NavigationSplitViewVisibility = .all
var body: some View {
NavigationSplitView(columnVisibility: $splitVisibility, sidebar: {
sidebar
}, detail: {
detail
})
.onChange(of: selectedItem) { _ in
    path.removeLast(path.count)
}
}
...
}struct FancySplitExampleView: View {
...
@State var splitVisibility: NavigationSplitViewVisibility = .all
var body: some View {
NavigationSplitView(columnVisibility: $splitVisibility, sidebar: {
sidebar
}, detail: {
detail
})
.onChange(of: selectedItem) { _ in
path.removeLast(path.count)
}
}
...
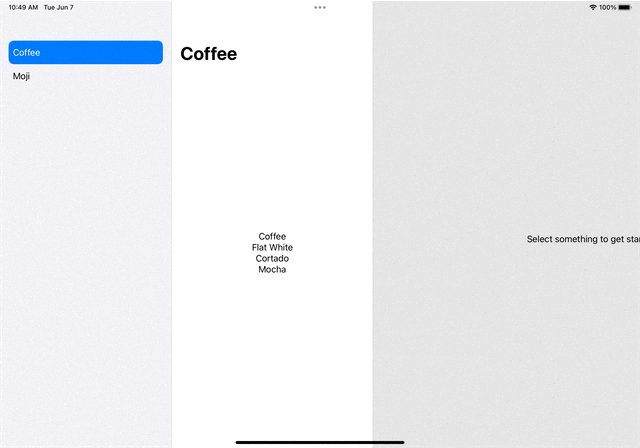
}You can also optionally provide a triple column experience.
Here, I've seperated out my experience into the sidebar, the list of content, and then the detail page which shows my selection.
Note: It looks like you have to have your content wrapped in a
NavigationStackor it cant be dynamically switched out.
struct FancySplitExampleView: View {
    ...
    @State var splitVisibility: NavigationSplitViewVisibility = .all

    var body: some View {
        NavigationSplitView(columnVisibility: $splitVisibility, sidebar: {
            sidebar
        }, content: {
            content
        }, detail: {
            detail
        })
        .onChange(of: selectedItem) { _ in
            path.removeLast(path.count)
        }
    }
    ...
}
struct FancySplitExampleView: View {
...
@State var splitVisibility: NavigationSplitViewVisibility = .all
var body: some View {
NavigationSplitView(columnVisibility: $splitVisibility, sidebar: {
sidebar
}, content: {
content
}, detail: {
detail
})
.onChange(of: selectedItem) { _ in
path.removeLast(path.count)
}
}
...
}
Here's what that feels like.
Thanks for reading!
You can find my code on github.
