
List Actions
SwiftUI lists have gained a lot of new bits in iOS 15, with one of them being a huge improvement to swipe actions, allowing for more than just delete. Let's take a look at how that works.
How does it work?
This one is very easy to get started with, but opens the door for lots of possibilities. Before we look at those, we'll need a list to start from.
struct CoffeeListView: View {
    @State var coffees = Coffee.all

    var body: some View {
        NavigationView {
            List {
                Section("Coffee") {
                    ForEach(coffees, id: \.hashValue) { coffee in
                        CoffeeItemView(coffee: coffee)
                    }
                }
            }
            .listStyle(InsetGroupedListStyle())
            .navigationTitle("Menu")
        }
    }

}
struct CoffeeListView: View {
@State var coffees = Coffee.all
var body: some View {
NavigationView {
List {
Section("Coffee") {
ForEach(coffees, id: \.hashValue) { coffee in
CoffeeItemView(coffee: coffee)
}
}
}
.listStyle(InsetGroupedListStyle())
.navigationTitle("Menu")
}
}
}In this case, its just a simple list that displays a view for each coffee in an array. The CoffeeItemView fetches an image from the web and shows it to the user.
struct CoffeeItemView: View {
    let coffee: Coffee

    var body: some View {
        HStack(alignment: .center) {
            AsyncImage(url: coffee.imageUrl) { image in
                image
                    .resizable()
                    .aspectRatio(contentMode: .fill)
                    .frame(width: 60, height: 60)
                    .clipShape(RoundedRectangle(cornerRadius: 12, style: .continuous))
            } placeholder: {
                placeholder
            }

            VStack(alignment: .leading) {
                Text(coffee.name)
                    .font(.headline)
            }

            Spacer()
        }
    }

    var placeholder: some View {
        Color.secondary
            .frame(width: 60, height: 60)
            .clipShape(RoundedRectangle(cornerRadius: 12, style: .continuous))
            .overlay(ProgressView())
            .progressViewStyle(.circular)
    }
}
struct CoffeeItemView: View {
let coffee: Coffee
var body: some View {
HStack(alignment: .center) {
AsyncImage(url: coffee.imageUrl) { image in
image
.resizable()
.aspectRatio(contentMode: .fill)
.frame(width: 60, height: 60)
.clipShape(RoundedRectangle(cornerRadius: 12, style: .continuous))
} placeholder: {
placeholder
}
VStack(alignment: .leading) {
Text(coffee.name)
.font(.headline)
}
Spacer()
}
}
var placeholder: some View {
Color.secondary
.frame(width: 60, height: 60)
.clipShape(RoundedRectangle(cornerRadius: 12, style: .continuous))
.overlay(ProgressView())
.progressViewStyle(.circular)
}
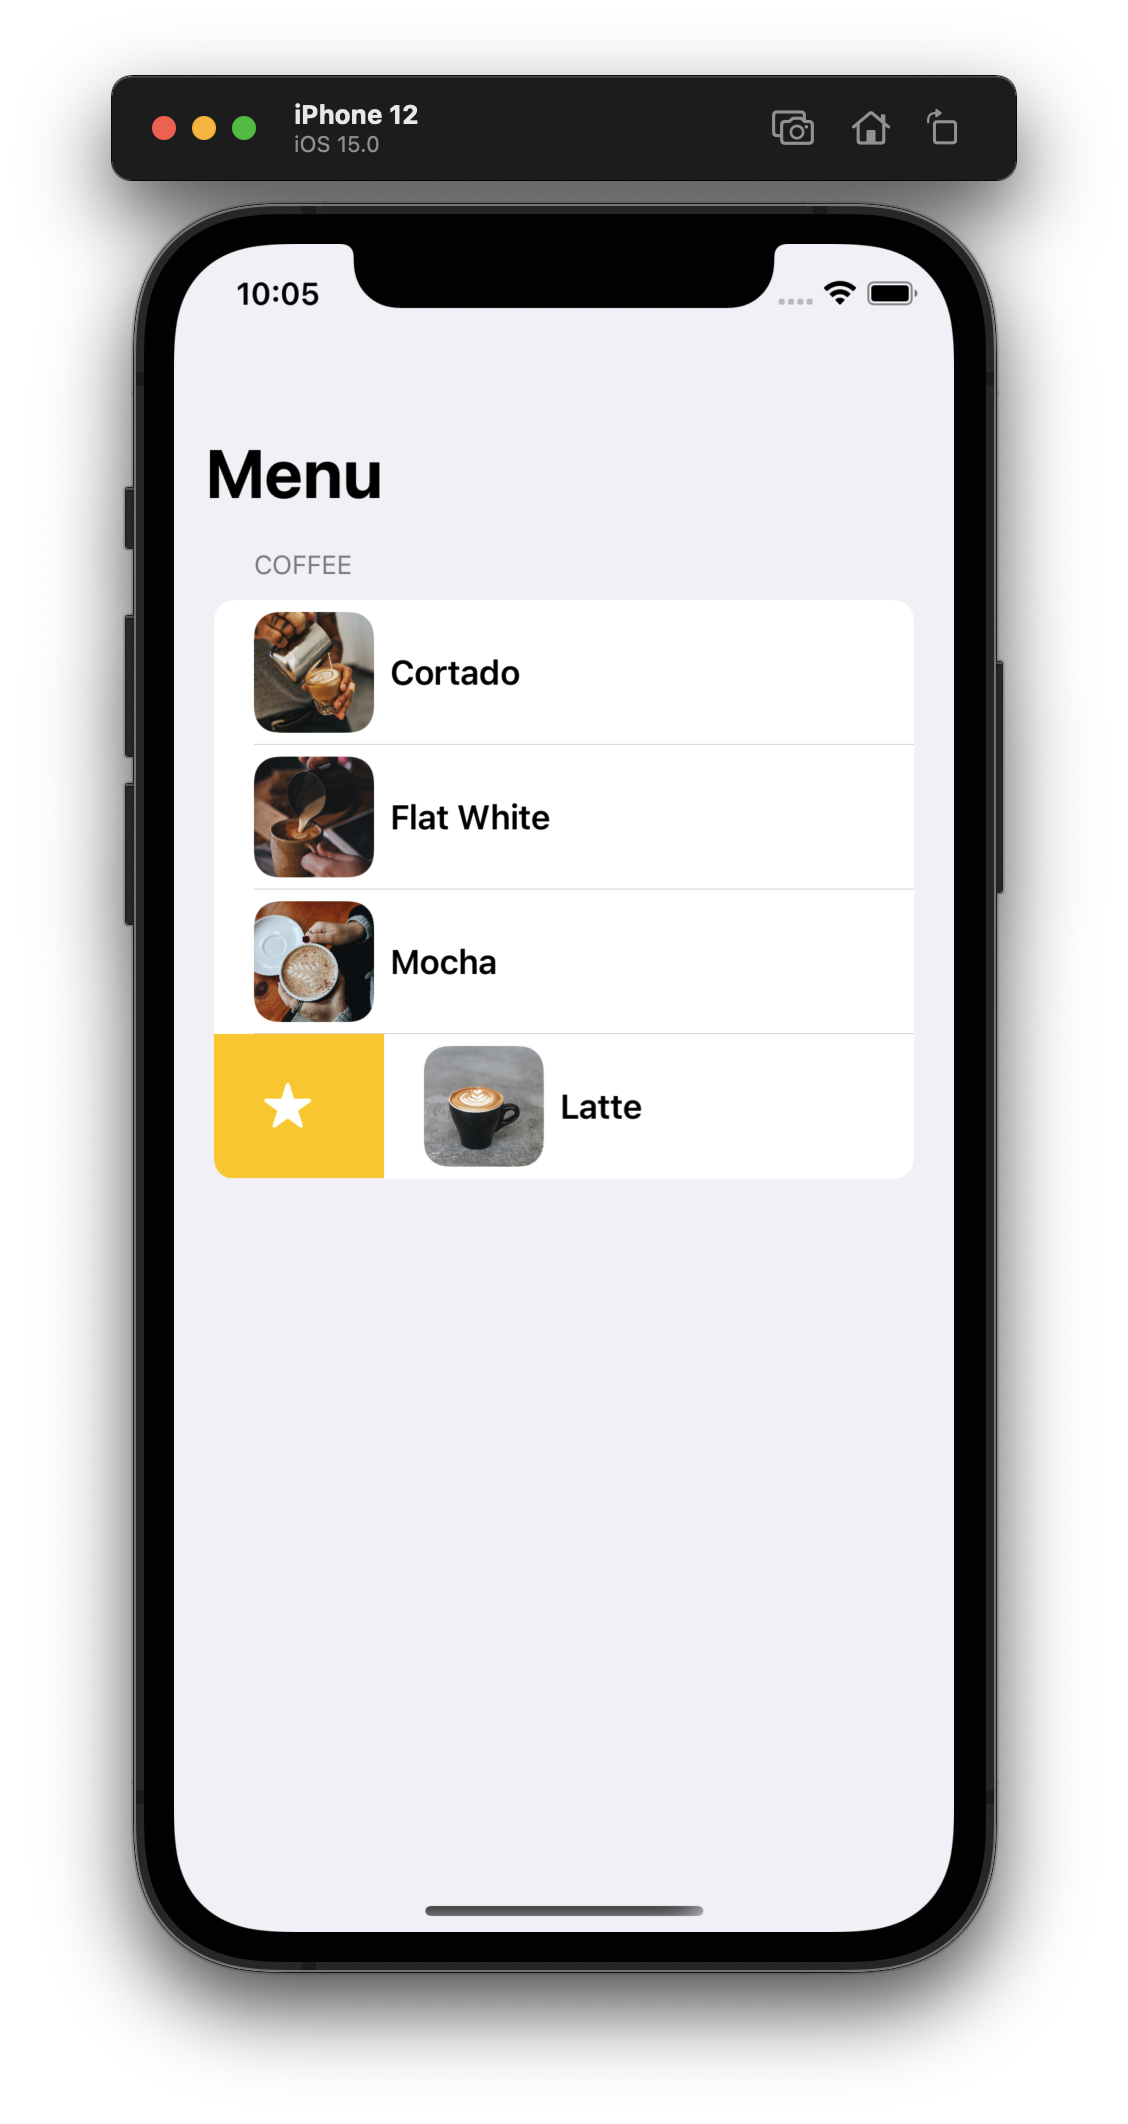
}What we're going to do is add swipe actions that will alllow a user to favourite a coffee.
To add a swipe action, we use the new swipeAction modifier, that lets us also set the edge for the action, if we want to allow a full swipe, and then the action itself. The action itself is actually a view, and for the examples today we'll be using a simple Button with an SF Symbol for the icon.
We're going to add a swipe action on the leading edge of our CoffeeItemView that will allow us to build our favourites functionality.
Add a second array of Coffees underneath our first array, called favouriteCoffees and set it to empty to begin with.
@State var favouriteCoffees: [Coffee] = []@State var favouriteCoffees: [Coffee] = []Now add a swipe action to our CoffeeItemView using the modifier we just talked about, with the content being a Button. The only thing to note on the button is that setting the tint will set the background of the swipe action for you.
CoffeeItemView(coffee: coffee)
	.swipeActions(edge: .leading) {
		Button(action: { favouriteCoffee(coffee: coffee) }, label: {
			Image(systemName: "star.fill")
		})
		.tint(.yellow)
	}
CoffeeItemView(coffee: coffee)
	.swipeActions(edge: .leading) {
		Button(action: { favouriteCoffee(coffee: coffee) }, label: {
			Image(systemName: "star.fill")
		})
		.tint(.yellow)
	}
In our action we need to push the coffee to the favourites array, and remove it from the other. To clean this code up, it should live in its own function that gets called in our action code, like above.
func favouriteCoffee(coffee: Coffee) {
  withAnimation {
    coffees.removeAll(where: { $0 == coffee })
    favouriteCoffees.append(coffee)
  }
}
func favouriteCoffee(coffee: Coffee) {
withAnimation {
coffees.removeAll(where: { $0 == coffee })
favouriteCoffees.append(coffee)
}
}At this point if you ran the app, you'd notice that theres a swipe action with a little star on the left, and if you swipe all the way and let go to activate it, the coffee goes away. Lets bring those missing coffees back.
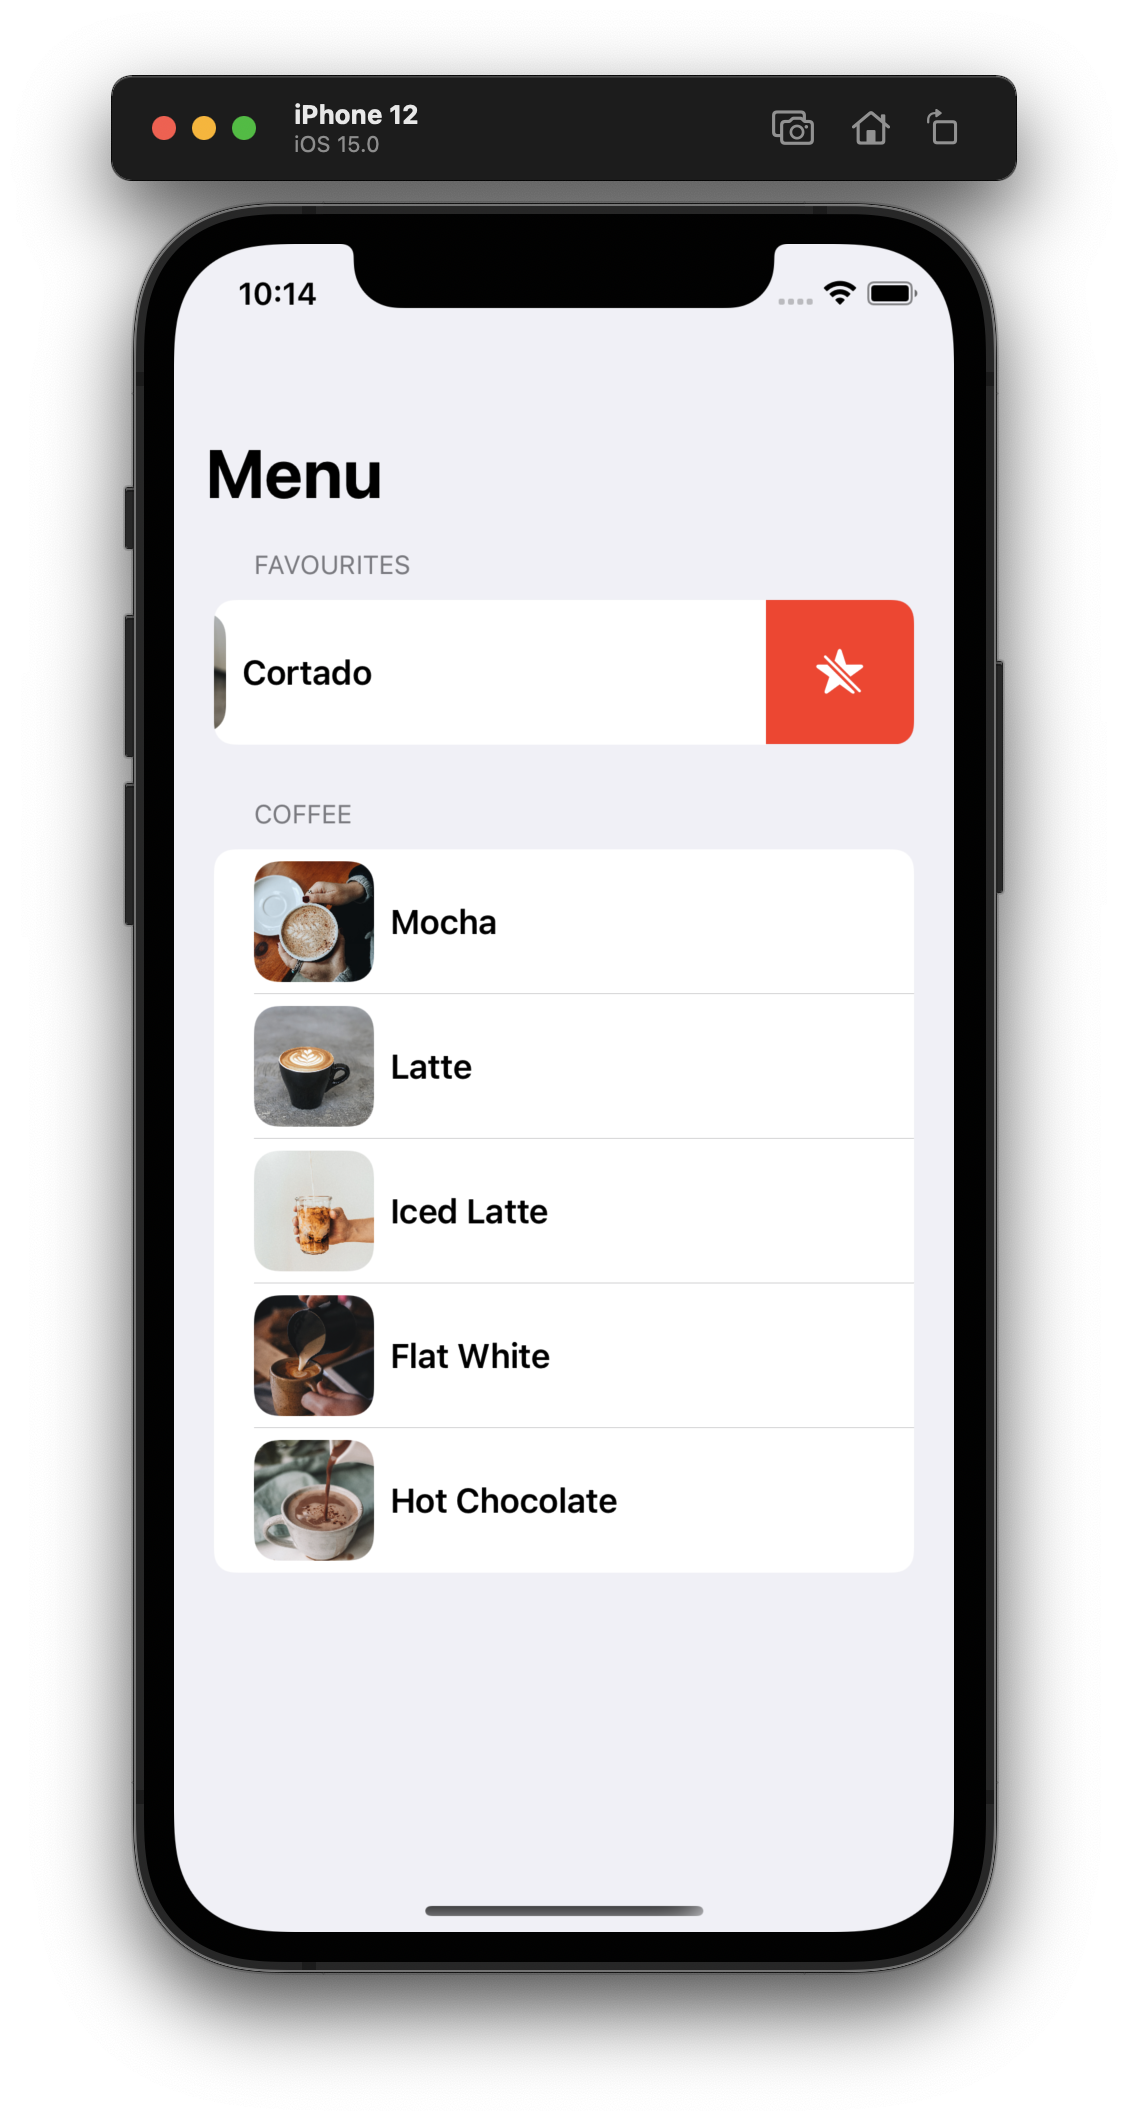
To show our favourite coffees we'll need a second section in the list that is powered by the favourite coffee array instead. We've allmost written all the code for this allready in our first section, we'll just need a couple tweaks.
if favouriteCoffees.count > 0 {
	Section("Favourites") {
		ForEach(favouriteCoffees, id: \.hashValue) { coffee in
			CoffeeItemView(coffee: coffee)
				.swipeActions(edge: .trailing) {
					Button(action: { unFavouriteCoffee(coffee: coffee) }, label: {
						Image(systemName: "star.slash.fill")
					})
					.tint(.red)
				}
			}
		}
	}
if favouriteCoffees.count > 0 {
Section("Favourites") {
ForEach(favouriteCoffees, id: \.hashValue) { coffee in
CoffeeItemView(coffee: coffee)
.swipeActions(edge: .trailing) {
Button(action: { unFavouriteCoffee(coffee: coffee) }, label: {
Image(systemName: "star.slash.fill")
})
.tint(.red)
}
}
}
}The whole view is wrapped in an if statement to make sure it only shows when we actually have some favourites. If we don't do this, the header will always be there and look a little strange. Next, we've set the ForEach to use favouriteCoffees instead of coffees, which will show our missing coffee when we favourite it.
Our action now calls unFavouriteCoffee(coffee:) instead, and uses a different symbol, with a red tint. Unfavourite coffee is exactly like favourite, but using the opposite arrays.
    func unFavouriteCoffee(coffee: Coffee) {
        withAnimation {
            favouriteCoffees.removeAll(where: { $0 == coffee })
            coffees.append(coffee)
        }
    }
func unFavouriteCoffee(coffee: Coffee) {
withAnimation {
favouriteCoffees.removeAll(where: { $0 == coffee })
coffees.append(coffee)
}
}If you swipe a coffee now, you can see it animate to the new section, and then if you swipe the other way it will animate down back to the bottom of the list.
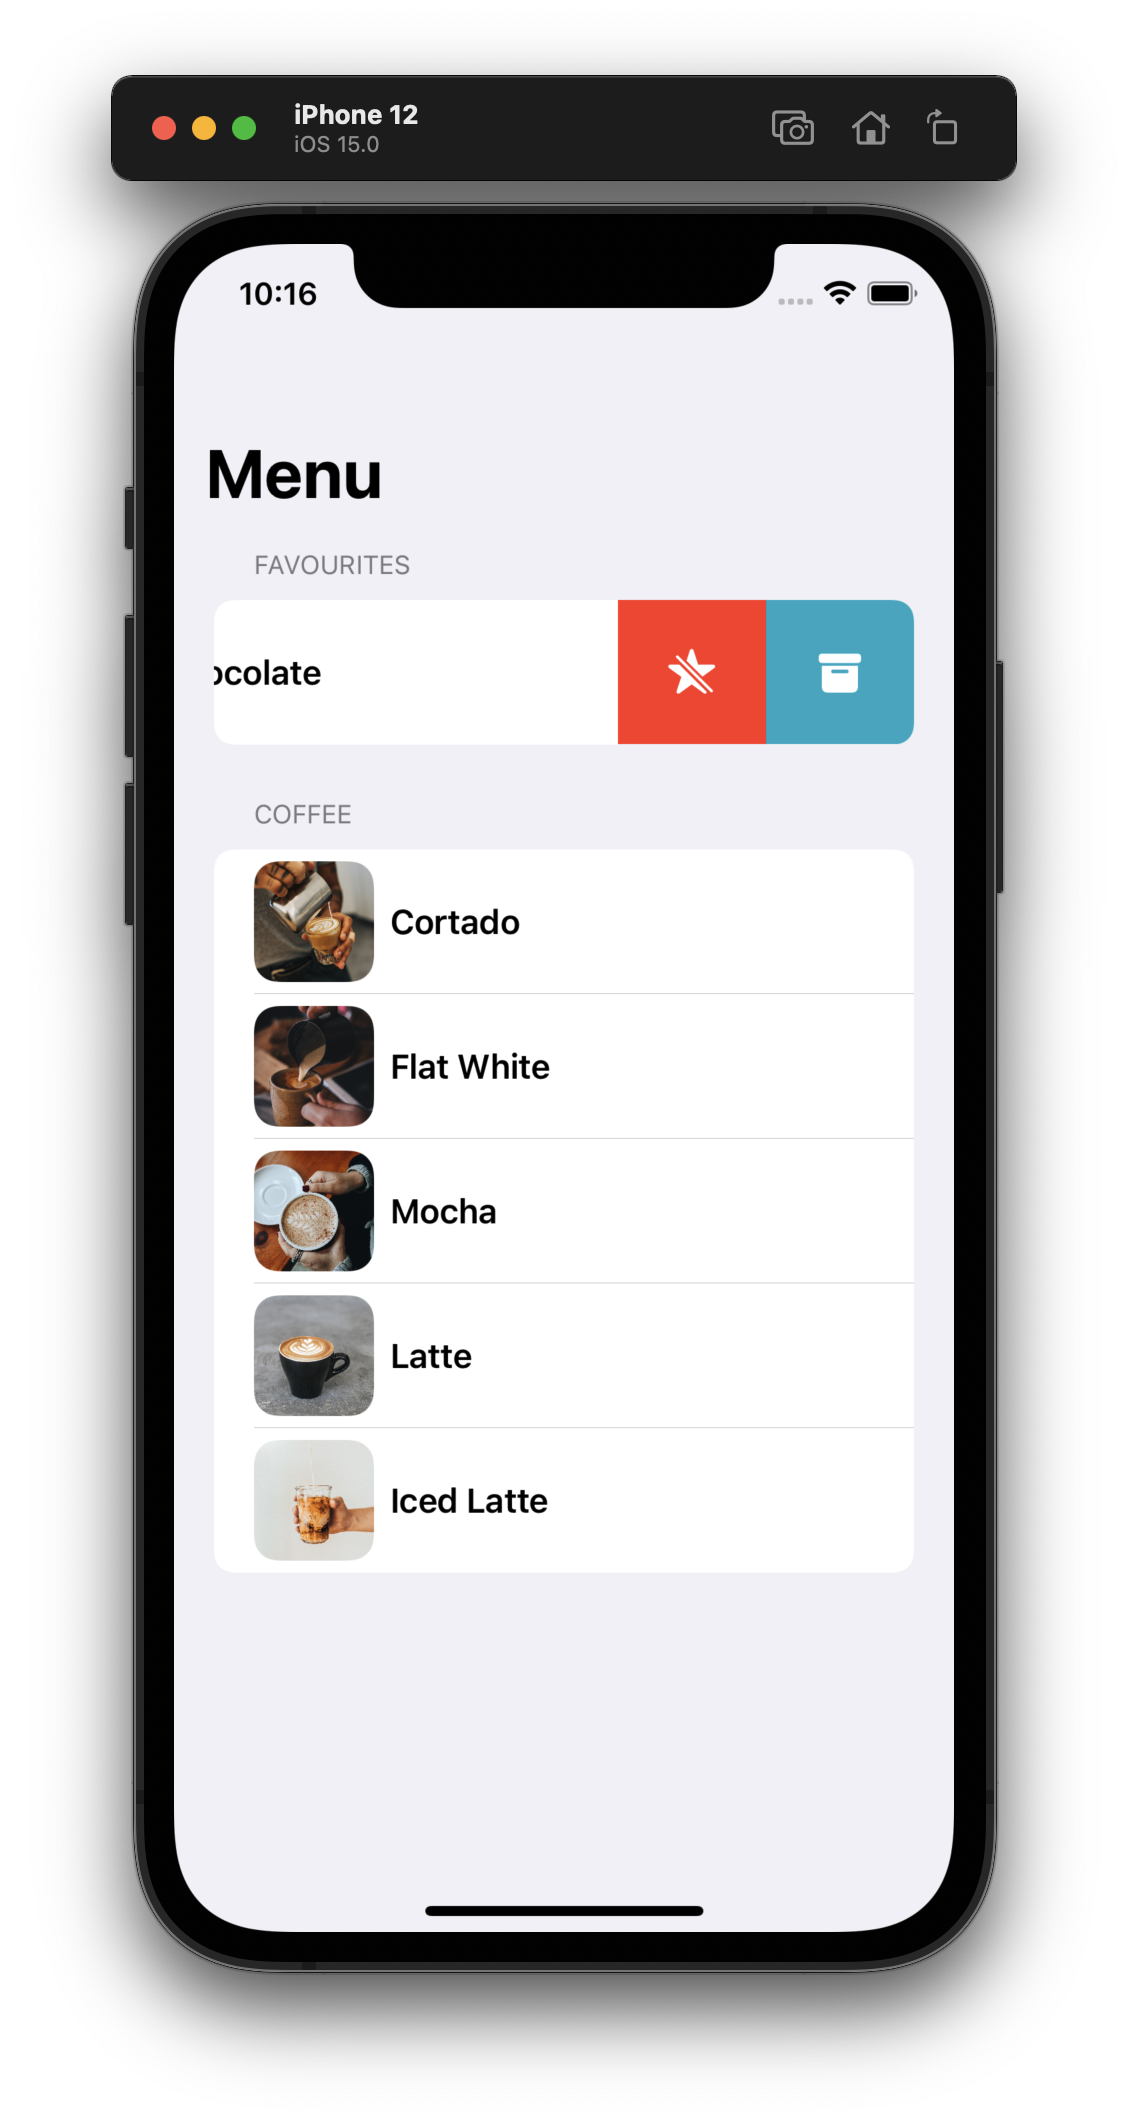
Taking it further
If you're a fan of the built in mail client on iOS, you'll know that sometimes you want to have more than just one swipe action. Adding that in SwiftUI is nice and easy, with us being allowed to add a second button to that swipeAction modifier.
.swipeActions(edge: .trailing) {
	Button(action: { archiveCoffee(coffee: coffee) }, label: {
		Image(systemName: "archivebox.fill")
	})
	.tint(.teal)
	Button(action: { unFavouriteCoffee(coffee: coffee) }, label: {
		Image(systemName: "star.slash.fill")
	})
	.tint(.red)
}.swipeActions(edge: .trailing) {
Button(action: { archiveCoffee(coffee: coffee) }, label: {
Image(systemName: "archivebox.fill")
})
.tint(.teal)
Button(action: { unFavouriteCoffee(coffee: coffee) }, label: {
Image(systemName: "star.slash.fill")
})
.tint(.red)
}These secondary swipe actions are useful for tertiary actions with lists, but try to avoid burying too much content in here.
As this argument is a view builder, you can actually use conditions to dynamically set the swipe actions. You might have a list of emails where you want to be able to mark the contact as VIP for example, but only for a certain mailbox. In our case, we're going to make it so you can only archive a Mocha.
.swipeActions(edge: .trailing) {
    if coffee.name == "Mocha" {
        Button(action: { archiveCoffee(coffee: coffee) }, label: {
            Image(systemName: "archivebox.fill")
        })
        .tint(.teal)
    }
    Button(action: { unFavouriteCoffee(coffee: coffee) }, label: {
        Image(systemName: "star.slash.fill")
    })
    .tint(.red)
}.swipeActions(edge: .trailing) {
if coffee.name == "Mocha" {
Button(action: { archiveCoffee(coffee: coffee) }, label: {
Image(systemName: "archivebox.fill")
})
.tint(.teal)
}
Button(action: { unFavouriteCoffee(coffee: coffee) }, label: {
Image(systemName: "star.slash.fill")
})
.tint(.red)
}Thanks for reading this quick intro to swipe actions in SwiftUI. An interesting challenge would be to have one function for favourite/unfavourite, and to only have one set of swipe actions that you show and hide based on which section the item is in.
You can find the code samples in my repo as always.
If you fancy reading a little more, or sharing your experiences, I’m @SwiftyAlex on twitter.
