
Meet Swift Data
It's finally here! observable should have been a hint at what was coming, and I'm personally really excited that we have it.
Swift Data is a framework to persist data in your app, entirely built around modern Swift, with no need for any "Unable to represent in Objective-c" warnings.
Lets get started.
Models
Models are the best part of SwiftData - they really just work.
My example today is going to be a basic app that tracks a Brew. We'll add to this model as we go, but to get started, we need very little code.
This model will have a brew type, a rating, and a date it was brewed.
@Model
final class Brew {
    var type: BrewType.RawValue
    var rating: Int
    var brewDate: Date
}

enum BrewType: String, Codable, CaseIterable { // I've added `String` and `CaseIterable` for some convenience later on.
    case espresso, aeropress, filter
}
@Model
final class Brew {
var type: BrewType.RawValue
var rating: Int
var brewDate: Date
}
enum BrewType: String, Codable, CaseIterable { // I've added `String` and `CaseIterable` for some convenience later on.
case espresso, aeropress, filter
}I've used a custom type here BrewType, but I'm storing its RawValue. This means that underneath, we're still storing a string.
For convenience, you could add a @Transient extension that alllows you to get the nice enum, without affecting the model.
extension Brew {
    @Transient
    var brewType: BrewType {
        BrewType(rawValue: self.type) ?? .espresso
    }
}
extension Brew {
@Transient
var brewType: BrewType {
BrewType(rawValue: self.type) ?? .espresso
}
}We have a lot more options available to us if we need more customisation. Lets say we had a unique identifier for each brew - we could add this, and enforce its unique-ness in code. We do this using @Attribute().
@Model
final class Brew {
    @Attribute(.unique) var brewIdentifier: UUID
}
@Model
final class Brew {
@Attribute(.unique) var brewIdentifier: UUID
}There's plenty more options too, and you can see them all here, but some highlights include...
spotlightwhich automatically indexes the valueexternalStoragewhich puts the value in seperate binary storageencryptwhich stores the value in an encypted form
Relationships
Lets make a relationship between a coffee brewer, and the brews you brew with it.
We'll start with a brand new, simpler, model.
@Model
final class Brewer {
    var name: String
}
@Model
final class Brewer {
var name: String
}Adding a relationship is trivial - we use another wrapper - @Relationship, which takes an argument of what to do when we delete, and the inverse so it can be tracked properly.
@Model
final class Brewer {
    var name: String

    @Relationship(.cascade, inverse: \Brew.brewer)
    var brews: [Brew] = []
}
@Model
final class Brewer {
var name: String
@Relationship(.cascade, inverse: \Brew.brewer)
var brews: [Brew] = []
}We'll have to make sure the inverse exists, so lets add that to Brew.
// Add the inverse to `Brew`
@Model
final class Brew {
    ...
    var brewer: Brewer
}
// Add the inverse to `Brew`
@Model
final class Brew {
...
var brewer: Brewer
}We now have a Brewer that has a reference to an array of brews, and it'll delete the brews when the brewer gets deleted.
Cascade options are the same as in core data just about, and include:
noAction, which would do nothingnullify, which would just clear off the relationshipcascade, which will delete the children toodeny, which will refuse to delete via the relationship
Swift Data does a lot of heavy lifting for us with these, like some of the more magical web ORMS, so we'll re-visit this when we look at saving.
## Configuring our App
To use our models, we have to configure our app. This is done in much the same way as core data, where we register a context at the top level, but this time with a dedicated modifier modelContainer, which takes an argument of our classes.
@main
struct Brew_BookApp: App {

    var body: some Scene {
        WindowGroup {
            ContentView()
        }
        .modelContainer(for: [Brew.self, Brewer.self])
    }
}
@main
struct Brew_BookApp: App {
var body: some Scene {
WindowGroup {
ContentView()
}
.modelContainer(for: [Brew.self, Brewer.self])
}
}Thats all you need to inject context right through your app.
There's more options, such as defining if you want an in memory store or not - which is super useful for tests. Checkout all the options here.
You can configure your own ModelContainer if you'd like, and this has a couple more options, such as the cloudKitContainerIdentifier. You can re-inject this using .modelContainer. I'll be sticking with the easy route.
@main
struct Brew_BookApp: App {
    let container: ModelContainer = {
        // Don't force unwrap for real 👀
        try! ModelContainer(
            for: [Brew.self],
            .init(cloudKitContainerIdentifier: "icloud.uk.co.alexanderlogan.samples.Brew-Book") // we'll come back to this one
        )
    }()

    var body: some Scene {
        WindowGroup {
            ContentView()
        }
        .modelContainer(container)
    }
}
@main
struct Brew_BookApp: App {
let container: ModelContainer = {
// Don't force unwrap for real 👀
try! ModelContainer(
for: [Brew.self],
.init(cloudKitContainerIdentifier: "icloud.uk.co.alexanderlogan.samples.Brew-Book") // we'll come back to this one
)
}()
var body: some Scene {
WindowGroup {
ContentView()
}
.modelContainer(container)
}
}Saving Data
Saving data is, you guessed it, very similar to Core Data.
You'll need a ModelContext and a model to save. The code is super simple, and looks like this.
func save() {
    let brewer = Brewer(name: brewerName)
    context.insert(brewer)
    do {
        // Try to save
        try context.save()
    } catch {
        // We couldn't save :(
        // Failures include issues such as an invalid unique constraint
        print(error.localizedDescription)
    }
}
func save() {
let brewer = Brewer(name: brewerName)
context.insert(brewer)
do {
// Try to save
try context.save()
} catch {
// We couldn't save :(
// Failures include issues such as an invalid unique constraint
print(error.localizedDescription)
}
}Just like with core data, your saving can fail, so you'll need to make sure your UI is ready to handle that. If you're using unique constraints, this could easily happen.
Any views that observe a query for brewers, will show this one right away.
This is all the code you'd need for a simple form that lets you save a Brewer.
import SwiftUI
import SwiftData
struct BrewerForm: View {
@Environment(\.modelContext) var context
@Environment(\.dismiss) var dismiss
@State var brewerName: String = ""
var body: some View {
Form {
TextField("Brewer Name", text: $brewerName)
Button(action: {
self.save()
self.dismiss()
}, label: {
Text("Save")
})
}
}
func save() {
    let brewer = Brewer(name: brewerName)
    context.insert(brewer)
    do {
        // Try to save
        try context.save()
    } catch {
        // We couldn't save :(
        // Failures include issues such as an invalid unique constraint
        print(error.localizedDescription)
    }
}
}import SwiftUI
import SwiftData
struct BrewerForm: View {
@Environment(\.modelContext) var context
@Environment(\.dismiss) var dismiss
@State var brewerName: String = ""
var body: some View {
Form {
TextField("Brewer Name", text: $brewerName)
Button(action: {
self.save()
self.dismiss()
}, label: {
Text("Save")
})
}
}
func save() {
let brewer = Brewer(name: brewerName)
context.insert(brewer)
do {
// Try to save
try context.save()
} catch {
// We couldn't save :(
// Failures include issues such as an invalid unique constraint
print(error.localizedDescription)
}
}
}Saving data where relationships are involved is a little bit more complicated, but only a very little bit.
You'll need a reference to the related object when you make your new one. Here's how we would save a Brew.
func save() {
    let brew = Brew(
        type: brewType,
        rating: rating,
        brewDate: brewDate
    )
    // Set the inverse of the relationship
    brew.brewer = brewer

    context.insert(brew)
    do {
        // Try to save
        try context.save()
    } catch {
        // We couldn't save :(
        // Failures include issues such as an invalid unique constraint
        print(error.localizedDescription)
    }
}
func save() {
let brew = Brew(
type: brewType,
rating: rating,
brewDate: brewDate
)
// Set the inverse of the relationship
brew.brewer = brewer
context.insert(brew)
do {
// Try to save
try context.save()
} catch {
// We couldn't save :(
// Failures include issues such as an invalid unique constraint
print(error.localizedDescription)
}
}All we have to do is make a Brew as if its a plain old swift object, then set the brewer property, and save it. This will correctly configure the brew for us, and it will then appear in the list of brews for the given Brewer. Nice!
There's a little gotcha here. Setting the inverse of the relationship does store the property, but it won't live update observers. For example, in a list of brews for a brewer, this wouldn't update right now. To get around this, we can instead directly use the array.
func save() {
let brew = Brew(
type: brewType,
rating: rating,
brewDate: brewDate
)
// Setting the inverse of the relationship does not live update as you'd expect
// brew.brewer = brewer
// context.insert(brew)
// Setting this way, does, so we'll do that for now.
// This also inserts for you.
brewer.brews.append(brew)
do {
// Try to save
try context.save()
} catch {
// We couldn't save :(
// Failures include issues such as an invalid unique constraint
print(error.localizedDescription)
}
} func save() {
let brew = Brew(
type: brewType,
rating: rating,
brewDate: brewDate
)
// Setting the inverse of the relationship does not live update as you'd expect
// brew.brewer = brewer
// context.insert(brew)
// Setting this way, does, so we'll do that for now.
// This also inserts for you.
brewer.brews.append(brew)
do {
// Try to save
try context.save()
} catch {
// We couldn't save :(
// Failures include issues such as an invalid unique constraint
print(error.localizedDescription)
}
}Here's the full BrewForm just incase.
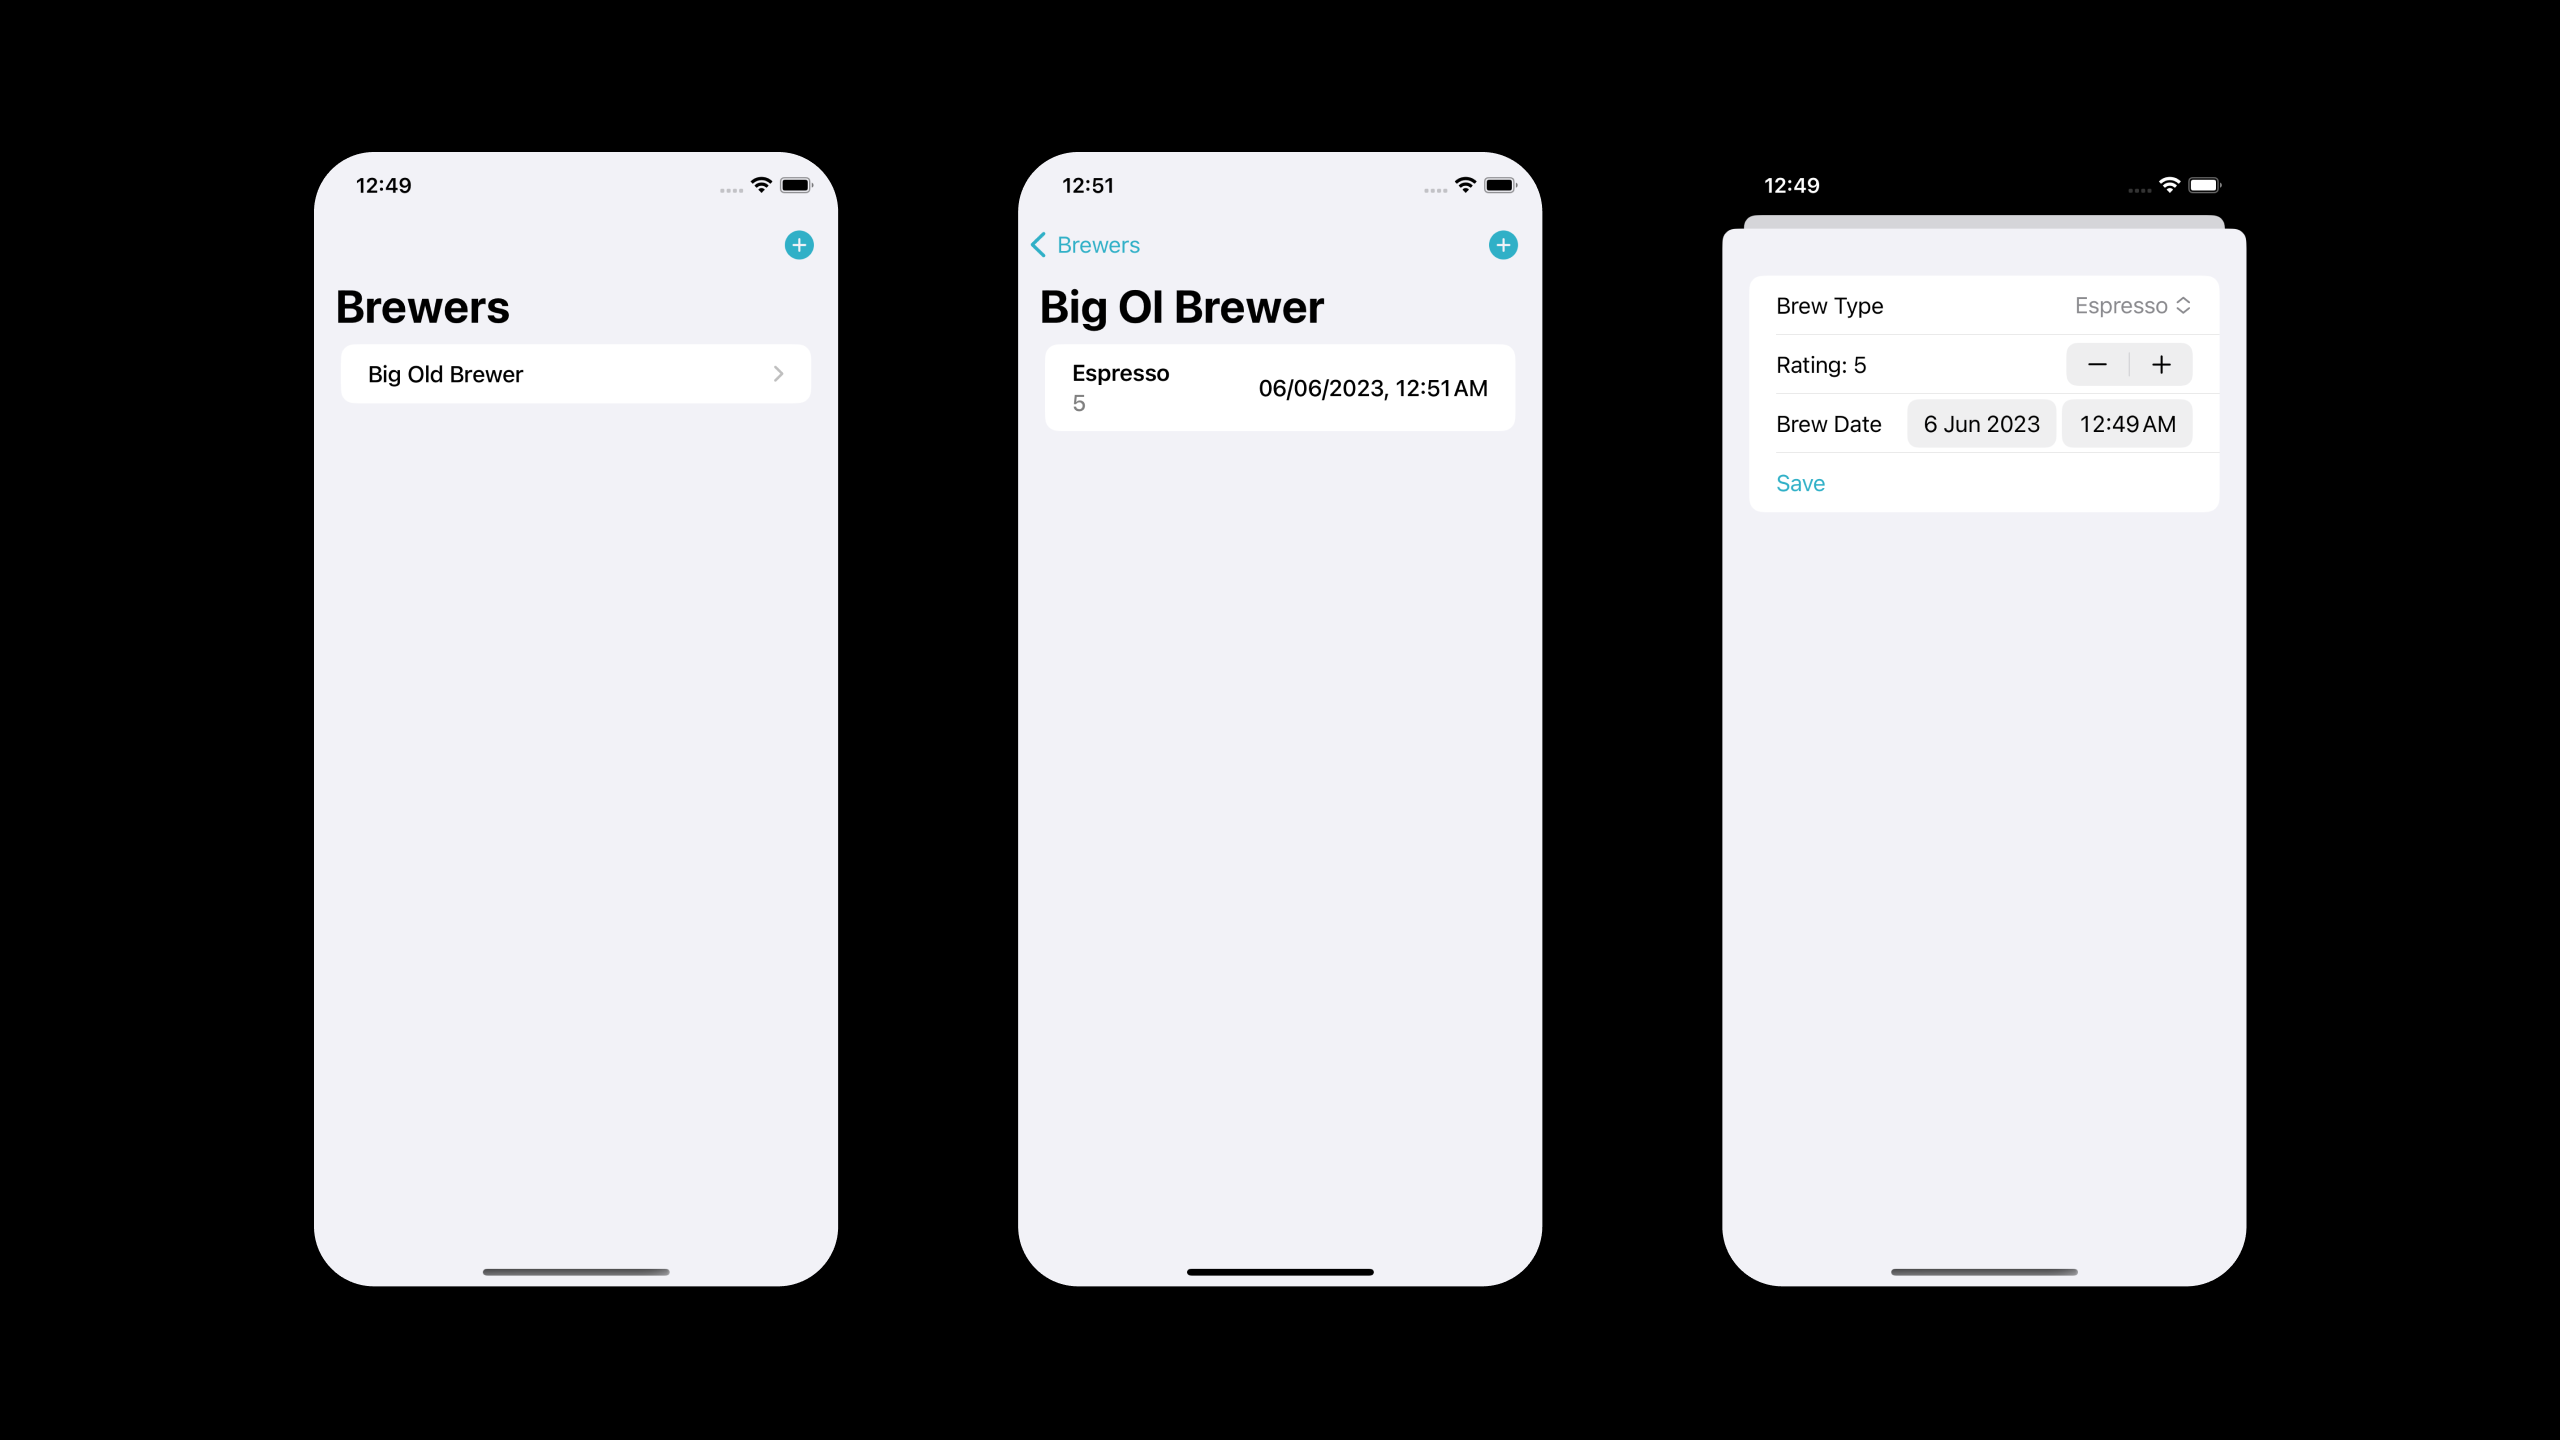
import SwiftUI
import SwiftData
struct BrewForm: View {
@Environment(\.modelContext) var context
@Environment(\.dismiss) var dismiss
@State var brewer: Brewer
@State var brewType: BrewType = .espresso
@State var rating: Int = 5
@State var brewDate: Date = Date()
var body: some View {
Form {
Picker(
selection: $brewType,
content: {
ForEach(BrewType.allCases, id: \.self) { brewType in
Text(brewType.rawValue)
}
}, label: {
Text("Brew Type")
}
)
Stepper(value: $rating, label: {
Text("Rating: \(rating.formatted())")
})
DatePicker("Brew Date", selection: $brewDate)
.pickerStyle(.inline)
Button(action: {
self.save()
self.dismiss()
}, label: {
Text("Save")
})
}
}
func save() {
    let brew = Brew(
        type: brewType,
        rating: rating,
        brewDate: brewDate
    )
    // Set the inverse of the relationship
    brew.brewer = brewer

    context.insert(brew)
    do {
        // Try to save
        try context.save()
    } catch {
        // We couldn't save :(
        // Failures include issues such as an invalid unique constraint
        print(error.localizedDescription)
    }
}
}import SwiftUI
import SwiftData
struct BrewForm: View {
@Environment(\.modelContext) var context
@Environment(\.dismiss) var dismiss
@State var brewer: Brewer
@State var brewType: BrewType = .espresso
@State var rating: Int = 5
@State var brewDate: Date = Date()
var body: some View {
Form {
Picker(
selection: $brewType,
content: {
ForEach(BrewType.allCases, id: \.self) { brewType in
Text(brewType.rawValue)
}
}, label: {
Text("Brew Type")
}
)
Stepper(value: $rating, label: {
Text("Rating: \(rating.formatted())")
})
DatePicker("Brew Date", selection: $brewDate)
.pickerStyle(.inline)
Button(action: {
self.save()
self.dismiss()
}, label: {
Text("Save")
})
}
}
func save() {
let brew = Brew(
type: brewType,
rating: rating,
brewDate: brewDate
)
// Set the inverse of the relationship
brew.brewer = brewer
context.insert(brew)
do {
// Try to save
try context.save()
} catch {
// We couldn't save :(
// Failures include issues such as an invalid unique constraint
print(error.localizedDescription)
}
}
}Fetching data
Fetching data is backed by more wrappers, and they have superpowers this time. Query is the main way you'll be interacting with this in your views, so lets take a look at that.
@Query(sort: \.name, order: .forward)
var brewers: [Brewer]@Query(sort: \.name, order: .forward)
var brewers: [Brewer]The query expects a keypath to sort by, and an order to do so. There's more advanced options too, that let you get more granular, such as configuring the new FetchDescriptor.
Lets look at a super simple FetchDescriptor that uses the brand new macro based #Predicate mechanism to only fetch a brewer if it contains "WWDC".
The first step is to make our FetchDescriptor itself, and make sure to tell it what Model we're operating on.
FetchDescriptor<Brewer>(
predicate: #Predicate { $0.name.uppercased().contains("WWDC") }
)FetchDescriptor<Brewer>(
predicate: #Predicate { $0.name.uppercased().contains("WWDC") }
)Our FetchDescriptor has just one predicate. The new #Predicate accepts a swift closure - but beware you can't just throw anything in here, for example, I couldn't use uppercased. But we don't have to learn a predicate language outside of swift itself, so thats great!
Next, lets use it. There's an extended initialiser on Query that allows you to provide a specific FetchDescriptor.
@Query(
FetchDescriptor<Brewer>(
predicate: #Predicate { $0.name.uppercased().contains("WWDC") }
)
)
var wwdcBrewers: [Brewer]@Query(
FetchDescriptor<Brewer>(
predicate: #Predicate { $0.name.uppercased().contains("WWDC") }
)
)
var wwdcBrewers: [Brewer]This would only fetch the brews with WWDC in the name.
If we want to see what that would look like in a view, its as easy as apple pie.
struct BrewerList: View {
@Query(sort: \.name, order: .forward)
var brewers: [Brewer]
var body: some View {
List {
ForEach(brewers, id: \.self) { brewer in
BrewerView(brewer: brewer)
}
}
}
}struct BrewerList: View {
@Query(sort: \.name, order: .forward)
var brewers: [Brewer]
var body: some View {
List {
ForEach(brewers, id: \.self) { brewer in
BrewerView(brewer: brewer)
}
}
}
}Deleting Data
Deleting data is a very similar API to saving, lets jump right in.
Deleting itself requires a reference to the context, the model you want to delete, and thats it.
Just like with adding a new entity, we have to make sure to catch any errors thrown by saving. These could be similar reasons like suddenly invalid models.
// Be sure to grab the context via the wrapper
@Environment(\.modelContext) var context

// Deletion
func delete(brewer: Brewer) {
    context.delete(brewer)
    do {
        try? context.save()
    } catch {
        print(error.localizedDescription)
    }
}
// Be sure to grab the context via the wrapper
@Environment(\.modelContext) var context
// Deletion
func delete(brewer: Brewer) {
context.delete(brewer)
do {
try? context.save()
} catch {
print(error.localizedDescription)
}
}Similar to our earlier gotcha, live updates rear their heads again.
If we were to delete a brew, attatched to a brewer, any observing views wouldn't see an update.
Here's a cut down sample of a view that exhibits this behaviour. When you swipe to delete, the object is deleted, but the view doesn't update.
struct BrewerDetailView: View {
    @Environment(\.modelContext) var context
    @State var showAddBrew: Bool = false

    let brewer: Brewer

    var body: some View {
        List {
            ForEach(brewer.brews, id: \.self) { brew in
                BrewView(brew: brew)
                    .swipeActions(content: {
                        Button(action: {
                            self.delete(brew: brew)
                        }, label: {
                            Label("Delete", systemImage: "xmark.bin.fill")
                        })
                        .tint(Color.red)
                    })
            }
        }
        .navigationTitle(brewer.name)
    }

    func delete(brew: Brew) {
        context.delete(brew)
        do {
            try context.save()
        } catch {
            print(error.localizedDescription)
        }
    }
}
struct BrewerDetailView: View {
@Environment(\.modelContext) var context
@State var showAddBrew: Bool = false
let brewer: Brewer
var body: some View {
List {
ForEach(brewer.brews, id: \.self) { brew in
BrewView(brew: brew)
.swipeActions(content: {
Button(action: {
self.delete(brew: brew)
}, label: {
Label("Delete", systemImage: "xmark.bin.fill")
})
.tint(Color.red)
})
}
}
.navigationTitle(brewer.name)
}
func delete(brew: Brew) {
context.delete(brew)
do {
try context.save()
} catch {
print(error.localizedDescription)
}
}
}The trick to fix this is the same as before - mess with the array.
func delete(brew: Brew) {
    context.delete(brew)
    // We have to explicitly remove from the array, or the view won't update.
    brewer.brews.removeAll(where: { innerBrew in
        innerBrew == brew
    })
    do {
        try context.save()
    } catch {
        print(error.localizedDescription)
    }
}
func delete(brew: Brew) {
context.delete(brew)
// We have to explicitly remove from the array, or the view won't update.
brewer.brews.removeAll(where: { innerBrew in
innerBrew == brew
})
do {
try context.save()
} catch {
print(error.localizedDescription)
}
}You can also wrap your delete operations in a withAnimation block for some free animations.
Everything else
That was a quick sample of everything you need to get started on your Swift Data journey. I'll be writing more on this over the coming weeks, and I'd encourage you to play with it yourself.
To make things easier to understand, I've attatched a sample which should help you get through the journey.
psst, it's a beta.
This is a beta, and yes, there are some issues.
- Sometimes it will just crash on a given entity. This can happen on any random app run after saving.
- When you run your code you will often get told something doesnt conform to
PersistentModel- don't worry, just build again. - Live updates of relationships on models don't work yet. It appears in general live updates aren't working too well, and you can re-create this using Apple's sample too.
As these get fixed, i'll come back here and delete these notes.
I'd like to thank @DonnyWals for his tweet on the live data observables that helped me fix the update bug <3
What do you think? I wish I could drop CoreData right now, but i'm very excited to see what I can do quickly in my next apps using this.
The sample for both this version of the data store, and a follow up that supports the cloud, can be found on Github.
If you fancy reading a little more, or sharing your experiences, I’m @SwiftyAlex on twitter.
